a peek inside the fishbowl

DIY ancient scroll

Before I launch into the nitty gritty I should mention that the actual scroll idea was Sarah’s. She’s always doing this kind of thing. She’s very much into “drop everything and do art” philosophy,  i.e. Suddenly (usually in the middle of my making dinner), she’ll announce that she’s going to make a toy, or an ice-fishing pond (which she did, complete with fur-lined Inuit-style hood, all out of paper), shoes out of tissue boxes, masks, glasses made of twisted wire… etc etc. That girl is such a creative kid. She’s always amazing me with her creations.

ANYWAY, one day a couple of weeks ago she decided she was going to do some “Chinese writing” and make a scroll. As an afterthought I offered to age it for her so we could pretend it was an ancient scroll … the kind you’d find in a treasure chest, for example. The idea went over pretty big. Yay! I like being the fun mom.

You can do it too.

How to make an ancient scroll

  1. 1. Decorate a plain piece of printer paper with a waterproof marker. Use your imagination (if you are 8 or under this step will be very easy for you)! Write a letter in curly cursive or other fancy lettering. Sarah made up some some Chinese text … but you can write your letters using hieroglyphics, or in Inuktitut, or some other language.
  2. 2. Take a break and make yourself a cup of tea. (Black tea works great.)
  3. 3. When the (used) teabag cools down a little bit, let your child wipe it across the sheets of paper. Let dry. (Pro tip: crumple the paper first to give it a worn look)
  4. 4. This next part is only for grown-ups. Grown-ups: light a small candle and run the edges of your paper along the flame. It’s best to do this over the kitchen sink …  the ashes have somewhere to fall and if you get an accidental flare-up you can drop the paper or douse it pretty quickly. It’s up to you how much burning to do.
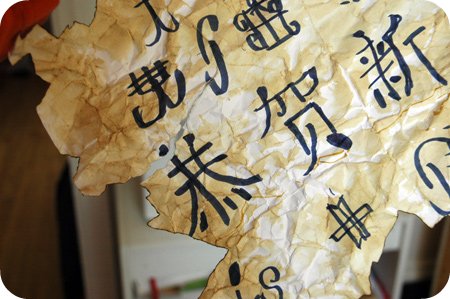
DIY ancient scroll

  1. 5. Shake off the extra ash and make sure no part of your scroll is still smouldering.
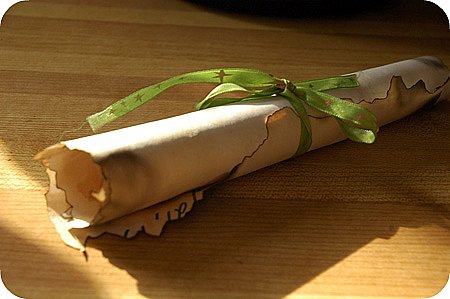
  2. 6. Tie with ribbon. Your ancient scroll is done!

Wondering how a kid could incorporate this into their playtime? How about using this technique for:

  • invites to a pirate- or explorer-theme party
  • clues for a scavenger hunt (we did something similar for a birthday party)
  • “props” for dress up
  • secret messages between friends and family
  • … or just for fun!

DIY ancient scroll - done!

Tags: , ,

03 Feb, 2009

Benefits and rewards of blogging

By andrea tomkins in Misc. life

This is an entry for the Mabel’s Labels BlogHer 2009 contest. They’re searching for a blogger to send to BlogHer, and I’d love the opportunity. (I’ve never been!)  Check out the details here.

What have been the rewards and benefits of participating in the blogging community?

Tough question, but I’ve had a lot of time to think about this one! :)

I’ve been keeping a blog in one form or another for about a decade. (That’s about 100 years in Internet time!) A friend of mine once referred to those early days (and I quote) as a “shrine to my daughter.” I suppose she was right. My words weren’t exactly intended to bring in a wide audience, in fact, I considered my website (the term “blog” wasn’t in common use then) as a kind of scrapbook, a place to store those early memories and share them with family and friends.

It was a place to sort out my thoughts and ideas as the days (and some very very long nights) passed with my newborn daughter.

My background in journalism, my love of photography and great design, my background in web development, and my eternal quest to live mindfully and find humour in our daily lives made it all a natural fit.

Little by little, my website became less about my daughter and more about me. Perhaps it coincided with a need to find myself, to better define who I was and where I was heading … a common issue for new moms who spend every waking hour (and many non-waking ones) feeding, changing and soothing their babies.

The advent of a commenting feature was a turning point for me, and precipitated a shift in my mind. My website changed. It wasn’t just an online journal anymore, it became a blog, a virtual water cooler, and I wasn’t the only one doing all the talking.

I remember receiving my first comment. A mom from Iowa (which might as well be on the other side of the world) posted a few words about something I had written. The connection was thrilling. The tiny space I had carved out suddenly became much bigger. And it’s grown! And keeps on growing! This amazes me to no end. 

I think of blogging in these terms: Blogging = Community. The very act of blogging has brought an incredibly rich tapestry of people into my life. I’ve connected with people I may have otherwise never had the pleasure of meeting and it’s changed my life for the better.

Today, I write about whatever is on my mind. It’s rekindled a love of writing and photography (and has resulted in paid photography work!), and I like to think my love for this medium shows. Blogging is not a chore for me, it excites me. And if you’re reading along, getting a laugh, or discovering something new or making a connection on any level, well, that makes me happy. And that’s my reward.

DIY lollipop flower for Valentine's Day

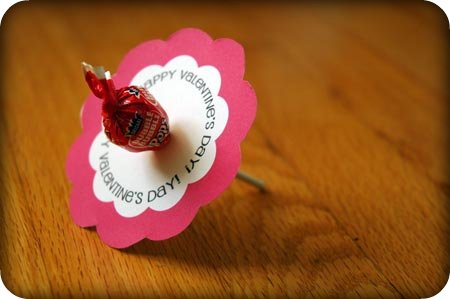
I’ve seen this idea elsewhere but couldn’t find a template for a lollipop flower I really liked … so I made one.(Now that I look at it I’m not sure if it turned out very flower-like. It reminds me of a ballerina tutu. Oh well, the girls like it, so I do too!)

Backstory: I gave up on store bought Valentine cards (I’m just soooo sick of SpongeBob and Barbie and Bratz) but I also realize it might be a lot to ask one kid to make 30 handmade Valentine cards (or more!).

So this is my compromise. Half-mass produced, half customized. :)

It’s easy:

  • Download the PDF template.
  • Print it out as many times as you need.
  • Cut out the flowers.
  • Decorate and address them on the underside. You can also cut out green “leaves” for this purpose and tape them to the lollipop “stems,” but I’m taking the easy route and skipping that part. :)
  • Punch a hole in the middle of the flower and push a lollipop through.
  • You are done!

I’ve promised myself that we’re not going to be cranking these out the night before. So we’re starting today!

Archives


  • Jeanie Maennling: I spent many wonderful days visiting my cousins and Uncle Herb and aunt Eleanor at the Farm in the 1950's. Mycousin Skippy (Sharon) and I got into l
  • alex: For a classic Canadian treat for valentine day , try a BeaverTail (a fried dough pastry) there its yummy
  • Juliet Luiz: I was at this park today and saw the foundation and historical sign which got me curious and let me to your blog post! Great information:) too bad t
  • Rowyn Tape: Hello, I was sitting at Easter dinner with my grandmother and she was telling me this story. She is Herbert Lytles daughter who eventually bought the
  • Bernie: I freeze ball sizes of bread dough for beavertails each winter season.Easy to thaw, roll out and fry. Best winter treat!
  • Jen_nifer: I feel very much the same about my SUP. Floating with snacks is fantastic! When I go on water with some current, I make sure that I paddle into the cu
  • sam: Great article. This is very insightful. Thanks for sharing

The Obligatory Blurb

My name is Andrea and I live in Ottawa with my husband Mark and our dog Sunny who is kind of a big deal on Instagram. During the day I work as a freelance writer. I am a longtime Ottawa blogger and I've occupied this little corner of the WWW since 1999. The Fishbowl is my whiteboard, water cooler, and journal, all rolled into one. I'm passionate about healthy living, arts and culture, travel, great gear, good food, and sharing the best of Ottawa. I also love vegetables, photography, gadgets, and great design.

If you're so inclined, you can read more about me here.

I've deactivated the commenting function as well as my contact form so if you want to get in touch, please drop me a line at quietfish@gmail.com. Thank you!


Goodreads