08 Feb, 2010
If you’re so inclined, here’s a butterfly Valentine’s Day card idea (and free template too!)
Posted by andrea tomkins in: Easy ways to make kids happy|File under crafty
So…
I am spending my Sunday evening tapping out this post instead of reading everything there is to know about the big fire at CTV Ottawa.
*fingers in ears NOTHING IS HAPPENING LA LA LA LA*
Anyway, yes, Valentine’s! It’s coming. SOON. And if you’re like me, you like to use this as an opportunity to do something fun and creative with your kids, right? Well, I suggest you start now. Many of us here in Ottawa have a P.D. day on the 12th and Family Day in the 15th, so many classrooms are probably exchanging cards on the 11th.
I poked around the interweb for ideas and really liked the butterfly card designed by Skip to My Lou. (Are you familiar with S.T.M.L? If you like pretty things and like crafts and are feeling creative you will REALLY like this site. Trust me. And wave goodbye to the next 60 minutes.)
I daresay her Valentine’s card design is much nicer than mine (I won’t be offended if you choose her template over mine, really I won’t), but I wanted one that was totally blank so the girls could write their own messages and decorate them their own way.
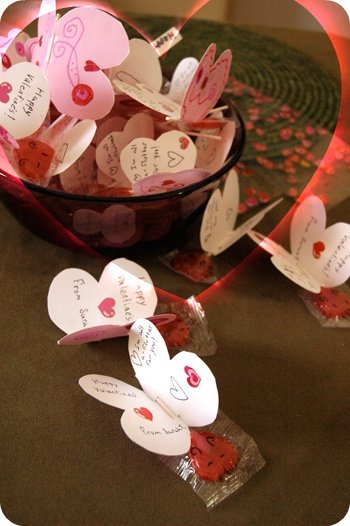
Here is the finished product:
… and here’s how we did it.
1) I made a template in Photoshop. If you’d like to make this card too, simplify your life and use my template. It’s up on Flickr (can someone tell me if you’re able to download and print it? Thanks!).
2) Print it out on cardstock, making as many copies as you need.
3) Buy a box of lollipops. They don’t have to be heart-shaped. These are just the ones I happened to grab at the store.
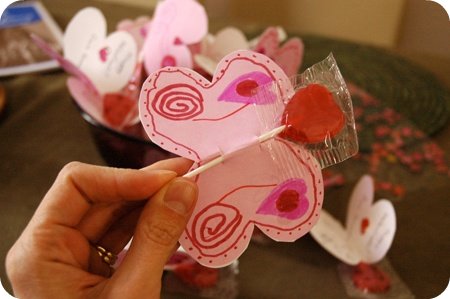
4) Have the child cut out the shapes, write the Valentine’s day messages and decorate each one. Sarah decided to use pink and red markers to decorate her butterflies with little patterns. She also used some heart-shaped stickers we had on hand. Rubber stamps would work really well for this, as would glitter and paint. It’s up to you!
5) Cut little slits in the butterfly body and poke the lollipop sticks through. Voila! You have wings! (We didn’t do googly eyes like S.T.M.L. but I think our solution still works.)
As you can see, Sarah decided to write her message (it reads: “I’m all a-flutter for you!”) on the white part, inside:

… and she did most of the decorating on the outer (pink) side. It’s up to you!
Sarah took an assembly line approach to her cardmaking. She cut them all out, then wrote all the messages, and then did all the decorating. I didn’t do very much at all.
I like how each butterfly is different.
Sarah worked really hard on them and is very proud of her efforts. I am too! :)
Let me know if you made these… and how they worked out for you!